How to reset a frozen iPhone

Posted by Unknown Kamis, 16 Agustus 2012 0 komentar

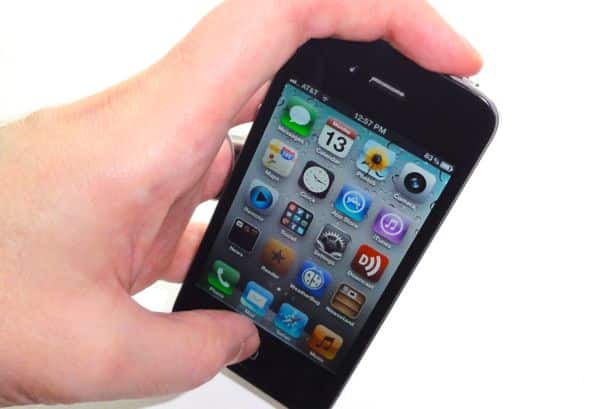
iPhone sleep wake button 300x204 How to revive a frozen iPhone

So, you’re happily swiping away on your iPhone when all of a sudden, it goes haywire—an app freezes up, the web browser spins and spins, or the screen simply stops responding to your fingertaps. Now what?

Well, you could always just try turning your iPhone on and off by pressing and holding the “sleep/wake” button on its top edge, but in some cases even the sleep button might not work.
Luckily, there’s another way to resuscitate a frozen, glitchy, or otherwise unresponsive iPhone: a so-called “hard” reset, which forces the iPhone to stop whatever it’s doing, shut down, and restart. Think of it as waking your iPhone with a cold bucket of water rather than a gentle nudge—crude, but often effective.
Here’s what you do:
  • Press and hold the “sleep/wake” button (at the top of the iPhone) and the Home button (below the screen) at the same time.
  • Keep holding both buttons until a red slider reading “slide to power off” appears at the top of the screen (it may take a few seconds, so be patient). Instead of swiping the slider, keep on holding those buttons.
  • After a few more seconds, the screen will go dark and the Apple logo will appear. Go ahead and release the buttons.
  • Wait a bit longer, and your iPhone’s home screen should appear again. Phew!

Other tip


This same trick applies to the iPad—just press and hold both the sleep/wake button and the Home key, and you’ll force your iPad to restart.

Baca Selengkapnya ....

How to read a Kindle book on the web, no Kindle (or smartphone) required

Posted by Unknown 0 komentar

Kindle library as viewed on the web 300x193 How to read a Kindle book on the web, no Kindle (or smartphone) required

Wish you could buy and read books from Amazon’s online Kindle store without actually owning a Kindle, tablet, or smartphone? Well, you can—all you need is a computer and a web browser.
Amazon’s web-based Cloud Reader lets you read any Kindle book purchased online or borrowed from your local library.
Cloud Reader works on any PC or Mac; the only requirement is that you must use either Apple’s Safari web browser or Google Chrome—no Internet Explorer, for now.

Don’t have either Safari or Chrome installed on your system? No problem; you can download them here (for Safari) or here (for Chrome), and both browsers are free.
The Cloud Reader also works on the iPad’s web browser, as well; for smartphones, though, you’ll need to download a special Kindle app. (More on that in a moment.)
Ready to crack open a Kindle book in your Web browser? Let’s get started:
  • Launch either Chrome or Safari (or open the iPad’s mobile Safari browser), then visit the Amazon Cloud Reader site at http://read.amazon.com.
  • Click the big yellow “Sign in to get started” button to sign in to your Amazon account—and if you don’t have a free Amazon account yet, go ahead and sign up for one.
  • Next, a window will appear with instructions for setting up your browser to store your Kindle books for “offline” reading, when you don’t have an Internet connection. Again, click the big yellow button and follow the instructions (they vary slightly depending on whether you’re using Safari or Chrome).
  • If you’ve already bought Kindle books before, you’ll see them in a grid in your browser; just click a book cover, and presto—you’re reading.
  • No Kindle books yet? Click the “Kindle Store” Button in the top-right corner of the page to begin shopping.
  • Once you’ve chosen a Kindle book to buy, make sure to select your Kindle Cloud Reader in the “Deliver to” drop-down menu, which sits right below the “Buy” button. And don’t worry, you can always send your purchased book to a new device under your account by selecting “Manage Your Kindle” under the “Your Amazon” menu near the top of the page.
  • As with the physical Kindle e-reader, the online Cloud Reader lets you add bookmarks as you read, and you can also change the font size or background color of the pages.
  • The Cloud Reader will also automatically download the most recently opened books in your Kindle library for when you don’t have an Internet connection (provided you went ahead and enabled the Cloud Reader’s offline reading mode). You can also manually select, or “pin,” a book for offline storage; to do so, just right-click on its cover in the Cloud Reader library.
  • Done reading? Then just close the browser window. And yes—you can always read your Kindle books from another browser or even a different PC or Mac once you log into your account.

Baca Selengkapnya ....

How to take a screenshot on your iPhone or iPad

Posted by Unknown 0 komentar
Taking a screenshot on the iPhone How to take a screenshot on your iPhone or iPad
Ever wanted to take a quick snapshot of your iPhone’s display? Or have you taken a screenshot by accident, without quite knowing how you did it?


Well, taking a screenshot on the iPhone (or iPad, or iPod Touch) is a nifty, easy trick—so easy, in fact, that more than a few puzzled readers have written in, wondering how snapshots of their iPhone’s home page wound up in their mobile photo albums.
So, what’s the trick?

Here’s what you do: press the “sleep/wake” button (it’s on the top edge of your iPhone) and the “Home” key (the one below the screen) at the same time, then release both right away.
iPhone camera roll 300x207 How to take a screenshot on your iPhone or iPad
You’ll find your new screenshots sitting in the Camera Roll on the Photos app.

Snap! Your iPhone, iPad, or Touch will make a shutter sound, the screen will flash for an instant, then everything will return to normal.

So, where’s the screenshot? Just open the Camera app, then click on Camera Roll—you’ll find it right there.

One more thing: if you press and hold the sleep/wake button and the Home key for too long, your iPhone will try to reset itself.

In that case, don’t be panic; just press the “Cancel” button when the red “Slide to shut off” slider appears.

Baca Selengkapnya ....

Google tip: Got a smartphone or tablet? Try handwriting for your next search

Posted by Unknown Kamis, 09 Agustus 2012 0 komentar
Ever feel the urge to skip the on-screen keypad on your iPhone or Android handset and just scribble words with your fingertip? If so, now’s your chance, courtesy of Google search.

Google recently launched a intriguing new feature that lets you write out search queries on touchscreen phones and tablets, including Android handsets and Apple’s iOS devices.
Once you activate the feature, you can start tracing letters and words anywhere the main Google search page. As you do, Google will analyze your scrawls and start plugging words into the search box.

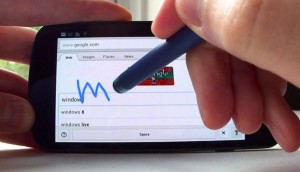
Google handwriting using a stylus 300x172 Google tip: Got a smartphone or tablet? Try handwriting for your next search
Rather not trace words with your finger? Try a stylus instead.

You can write both upper- and lowercase letters, as well as symbols such as “@,” “&,” “$” and “—”. Cursive isn’t recommended, but Google managed to do a decent job at interpreting my (admittedly shaky) cursive script.

As you’re writing, you’ll see a row of buttons at the bottom of the screen, including a help button, a space bar, a backspace button, and a button marked “G” that toggles the handwriting feature on and off.
You can also call up the keyboard at any time by tapping inside the Google search box.
Here’s how to turn Google’s handwriting feature on:
  • Visit the main Google home page, then tap the Settings link near the bottom of the page on your smartphone. Using a tablet? Tap the gear icon in the top-right corner of the page, the tap “Search settings.”
  • Scroll down to the “Handwrite” section, then tap “Enable.”
  • Tap the blue Save button at the very bottom of the page.
Had your fill of Google handwriting? Just go back to the Google search settings and switch Handwrite back to “Disable.”

Other tip


Not a fan of tracing letters with your finger? Well, you could always try a touchscreen-friendly stylus, which worked pretty well for me on a smaller smartphone screen.

Baca Selengkapnya ....

How to fix a crashy iPhone (or iPad) app

Posted by Unknown Minggu, 05 Agustus 2012 0 komentar
3 ways to fix a crashy iPhone app 3 ways to fix a crashy iPhone (or iPad) appGot an iPhone, iPad, or iPod Touch application that’s giving you fits because it keeps quitting unexpectedly? Believe me, I know the feeling.
So, what’s the deal? Well, there’s always the chance that something’s fundamentally wrong with the glitchy app, in which case you’ll just have to wait for its developer to release a bug fix.
But there’s also the possibility that the app—or your iDevice, for that matter—just needs a little kick in the pants to get everything running smoothly again.
Try this trio of quick, easy remedies before going another day without your favorite application.

Quit the app and launch it again

If you’ve got an app that’s freezing up or otherwise causing you trouble, sometimes it’s best to simply quit, clear the app’s “process” out of your iPhone’s memory, and start fresh.
Crashing iPhone apps 2 200x300 3 ways to fix a crashy iPhone (or iPad) app
Just tap the little red circle with the minus sign to quit an app and clear it from your iPhone's memory.
  • Start by pressing the Home key to return to your iPhone’s home screen (these instructions will also work for the iPad and iPod Touch, by the way), then double-click the Home key; the home screen will slide up, revealing a row of application icons.
  • Swipe the row with your fingertip until you find the app that’s acting funny, then press and hold the icon until it starts wiggling and a little red circle with a minus sign appears. Tap the red circle to make the icon disappear, indicating that the app has quit.
  • Now, go back and find the app icon on your home screen, then tap to launch it again.

Restart your iPhone

So, you tried quitting your buggy application and restarting it, but still, no dice. Now what?
Well, it’s possible that your iPhone, iPad, or iPod Touch may simply be running low on system memory—in other words, it may have so much going on at once that it’s essentially suffering from brain freeze. Restarting your device might do the trick.
  • Press and hold the power button at the top of your iPhone until a red slider appears with the instructions, “slide to power off.” Go ahead and do it.
  • After a few seconds, your iPhone (or iPad, or iPod Touch) will power off completely; wait a few more seconds, then press and hold the power button until the “Apple” logo appears.
  • Once your iPhone is up and running again, give your misbehaving app a try.

Delete and reinstall

So, is your app still crashing? Let’s try one more thing: deleting the app off your device completely and reinstalling it from scratch. (And don’t worry—you can always re-download a previously purchased app from the App Store.)
Crashing iPhone apps 1 200x300 3 ways to fix a crashy iPhone (or iPad) app
You may lose all of an app's stored data if you delete it, so think twice before proceeding.
  • Find the application’s icon on your iPhone’s home screen, then tap and hold it until all the icons on the screen begin to shake.
  • See the little “x” on the corner of the app icon? Tap it. A message will appear warning your that if you continue, you’ll delete all of the app’s data—including, say, any saved documents or game progress. Keep that in mind before proceeding.
  • Ready to move ahead? Tap the “Delete” button, and the app will be wiped off your phone.
  • Now, time to reinstall. Launch the App Store application, and either a) search for the app your just deleted or b) find it in your list of previously installed apps. (Just tap the “Updates” tab at the bottom of the screen, tap “Purchased,” select the “Not On This iPhone” filter, and look through the list until you find your app.) Remember that you won’t be charged twice for an app you’re re-downloading.
  • Last but not least, launch your reinstalled application; with any luck, no more crashes.

Baca Selengkapnya ....

iPhone tip: Where do I find my “archived” e-mail messages? (reader mail)

Posted by Unknown 0 komentar
How to find archived messages on your iPhone iPhone tip: Where do I find my archived e mail messages? (reader mail)Mark writes: I was filing some mail on my iPhone 4, but instead of putting my messages in a folder I pressed “Archive”. Where is this archive and how can I retrieve items?

Hi Mark! So, I’m guessing you were filing messages in a Gmail account, correct? Well, don’t worry. Your archived e-mail hasn’t gone far.
When you set up a Gmail account on the iPhone (or iPad, for that matter), you get the option of “archiving” your e-mail messages rather than deleting them.
Archive icon in the iPhone Mail app 300x199 iPhone tip: Where do I find my archived e mail messages? (reader mail)
When it comes to Gmail, the iPhone replaces the usual Trash icon with an “Archive” button.
Indeed, you’ve probably noticed that when you open a Gmail message, the usual “Trash” icon at the bottom of the screen is missing; instead, there’s a tiny box with an arrow pointing inside.
Also, when you swipe a message in your Gmail inbox, you’ll see a red “Archive” button appear rather than a button marked “Delete.”
OK, so what happens when you archive your messages? Where do they go?
Easy—they’ve been shuffled into Gmail’s “All Mail” folder.
To find an archived message, here’s what you do:
  • Tap the iPhone’s Mail icon, go to the main Mailboxes screen (if you’re viewing a particular mailbox, you’ll need to tap the navigation arrow at the top of the screen to back up), scroll down to the Accounts section, and select your Gmail account.
  • You should now see a list of all your Gmail folders—and near the top, you’ll see one marked “All Mail.” Tap it; within a few seconds, your iPhone will load the latest messages in your All Mail directory.
  • If you don’t see the message you archived, try searching; scroll to the top of the message list, then swipe down again with your finger until the search bar appears.
  • You can, of course, also find your archived messages by searching your Gmail account on the web.

Other tip

Want to delete your Gmail messages rather than archiving them? Just tweak an option in your iPhone’s Mail settings.
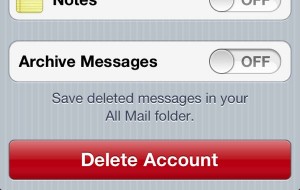
    Archive Messages setting on iPhone 300x190 iPhone tip: Where do I find my archived e mail messages? (reader mail)
    To delete messages rather than archiving them, switch the “Archive Messages” setting to “Off.”
  • Tap the Settings icon on your iPhone’s home screen, tap “Mail, Contacts, Calendars,” then select your Gmail account.
  • On the next screen, you’ll see a switch marked “Archive Messages.” Tap the switch to the “Off” position.
  • Now, go back to your Gmail inbox in the Mail app, open a message, and you should see the standard trash icon at the bottom of the screen rather than the archive icon.

Baca Selengkapnya ....

How to tap the Menu button in Android Phone

Posted by Unknown Rabu, 01 Agustus 2012 0 komentar
Ever get stumped while using your Android phone? Maybe you want to open a new browser window, or create a new email message, or shuffle your music … but you can’t find the right button on the screen, and before long, you feel your frustration level starting to rise.


One you do, chances are the very menu item you were hunting for will pop up on the screen.
Now, the good news is every Android phone has a Menu button. The bad news? It’s not always in the same place, and it may not even be a physical button.
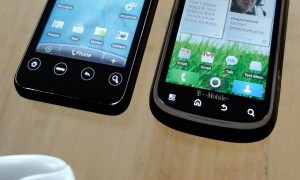
On some handsets, the Menu key sits all the way on the far-left edge of the row of buttons; on others, it’s the second key to the left, having swapped places with the Home key. And still other manufacturers put the Menu key on its own, smack-dab in the middle.
Android Menu key 300x180 Android smartphone tip: When in doubt, tap the Menu key
The "Menu" key comes in different shapes and sizes, but every Android phone has one.

Making matters even more interesting is the fact that the Menu key is rarely labeled as clearly as it should be.
In some cases, the Menu key is indeed inscribed with the word “Menu”; in others, though, it’s stamped with an obscure icon, like a four-cell grid or a column of short horizontal lines.
Oh, and here’s another wrinkle.
Some newer smartphones running on in the latest “Ice Cream Sandwich” version of Android (a.k.a. Android 4.0) have done away with physical buttons altogether, including the “Menu” key.

Android ICS menu button 300x195 Android smartphone tip: When in doubt, tap the Menu key
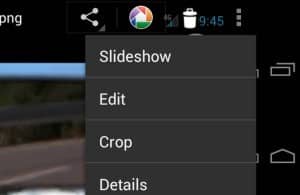
Newer Android phones do away with physical keys altogether, but there's still a virtual "Menu" button (see the three dots?) in the corner of the screen.

Instead, you’ll find a virtual Menu button (a.k.a. the “action overflow” button, in Android-speak) in almost any application. The trick? Look for a tiny column of three dots in a corner of the screen, or sitting at the bottom of the display.
Tap the three dots, and you’ll get a new batch of menu options, just like you would with the physical Menu key on older Android phones.
Wherever the Menu key is on your particular phone (and whatever it looks like), you’ll want to get cozy with it. Believe me, it’s your friend.

Baca Selengkapnya ....

How to wipe everything off for Android phone

Posted by Unknown 0 komentar
Ready to upgrade to a brand-new iPhone or the latest Android handset? Or maybe you’re trading in your smartphone for a good old-fashioned “feature” phone.
If that’s the case, good for you—and you’re also probably thinking of selling your existing handset on Craigslist or eBay, trading it in for cash, or even giving it to a (very lucky) friend or loved one.
Well, here’s the thing: your old iPhone or Android device is simply brimming with all kinds of personal data, like usernames, passwords, phone numbers, photos, email … you name it.

Now, you’d never hand over family photos, your checking account numbers, or a stack of email to a perfect stranger, would you? Of course not—but that’s essentially what you’d be doing were you to sell or give away an old iPhone without wiping it first.
Luckily, you can erase every last bit of personal data off your iPhone or Android phone in just a few taps.

For the iPhone:


  • Tap the Settings icon on the main home screen, then tap General.
  • Scroll down to the bottom of the screen and tap Reset.
  • On the next page, tap the second button on the screen—the one that reads “Erase All Content and Settings.” If you’ve locked your iPhone with a passcode, you’ll have to enter it before proceeding.
  • Now, a little dialog box will appear at the bottom of the screen that reads: “This will delete all media and data, and reset all settings,” along with a big red button marked “Erase iPhone.” If you’re really, truly ready, press the button—and keep in mind that it could take anywhere from several minutes to an hour for your iPhone to completely wipe all your data. Indeed, you might want to plug in your iPhone’s AC adapter if its battery is running low.

For Android phones:


  • Tap the Applications icon at the bottom of your phone’s home screen, then find and tap the Settings icon.
  • Unfortunately, this is where things get a tiny bit tricky. You’re looking for the “Factory data reset” option, but different Android phones list it under different headings. Tap the “Privacy” heading first; if you don’t find the “Factory data reset” option at the bottom of the list, hit the Back button, and try “SD & phone storage” next; you’ll probably find it there.
  • Once you’ve found and tapped “Factory data reset,” you’ll jump to a page that describes what happens when you hit the “Reset phone” button: your Google ID info will be erased, your installed applications will be wiped, and all your system settings will be reset. There may also be the option to erase your phone’s removable microSD memory card, where photos, music, and videos may be stored; if you’re not planning on keeping the microSD card for yourself, go ahead and check the box.
  • OK, ready? Tap the “Reset phone” button. Android will give you one last chance to change your mind; if you’re all set, tap “Erase everything.”
  • As with the iPhone, it could take several minutes or longer for your Android phone to erase itself—and again, if your handset is low on power, you should connect the AC adapter.

Baca Selengkapnya ....
Trik SEO Terbaru support Online Shop Baju Wanita - Original design by Bamz | Copyright of android apple.